How To Set Up SDL 2 In CodeBlocks On Windows
Setting up SDL 2 with CodeBlocks might be a real pain unless you know the right way to do it.
When I first started working with SDL 2 I had to suffer a lot. Many an hour was spent on researching how to fix the errors shown by the CodeBlocks IDE (Integrated Development Environment). I HAD NO CLUE!
But, I've learned it the hard way and I'm writing this blog so that you may set up Simple DirectMedia Layer conveniently and begin creating cool applications with it.
But, I've learned it the hard way and I'm writing this blog so that you may set up Simple DirectMedia Layer conveniently and begin creating cool applications with it.
What is SDL?
The full form of SDL is Simple DirectMedia Layer.
"Simple DirectMedia Layer is a cross-platform software development library created to provide hardware abstraction layer for computer multimedia hardware components..." Courtesy: Wikipedia: SDL
Simply put, SDL was created in order to control things like graphics, sound, keyboards, joysticks etc.
It's an API (Application Program Interface) that facilitates the process of interacting with the mentioned hardware features using C++.
And the coolest part of all is that it takes the Windows/Linux/Mac/Android/iOS tools and wraps in a manner that you may code something in SDL and compile it to whatever platform it supports.
Prerequisites
What you need to get started with SDL is that you have to learn the basics of C++ and download Simple DirectMedia Layer library from here.
Setting up SDL
To set up SDL on CodeBlocks firstly you have to download the SDL headers, libraries, and binaries.
You'll need to go to the official SDL website - http://libsdl.org/download-2.0.php
You'll need to go to the official SDL website - http://libsdl.org/download-2.0.php

CodeBlocks uses the MinGW compiler by default. So you have to download the MinGW development libraries.
You can extract the tar.gz archive by using the following command tar -xzf {filename}.tar.gz
Please note that you have to open the command prompt in the directory where the tar.gz archive is located.
After you're done with extracting it, there should be a folder called SDL-2.x.x. (Here, 'x' denotes the version you've downloaded. At the time of writing the blog and as you can see in the snapshot, the SDL version is SDL2-2.0.8)
Inside of that folder, there should be many a folder and file. There you'll see a folder called i686-w64-mingw32 which contains the 32bit library and x86_64-w64-mingw32 which contains the 64bit library.
In my case, I'm using the 32bit version of CodeBlocks IDE. So, I'll open the folder called i686-w64-mingw32. Inside it, there should be include, lib and bin folder and everything else needed to compile and run SDL applications.

Start CodeBlocks IDE and create an empty project as shown in the picture.
Create a new folder inside the directory where the {name of your project}.cbp file is located and name it 'deps' ('deps' is used as a short for dependencies.). This is where we are going to put most of the external components necessary for the setting up of SDL.
Now copy the include and lib folders from the i686-w64-mingw32 folder and paste them inside the deps folder.
We also need to put the runtime binary file, i.e, the dll file somewhere our program can link with it during runtime. Either we can put the dll file in the same directory where our executable program is or we can put it in the system directory, i.e, C:\WINDOWS\SYSTEM32
I prefer putting the dll file in the same directory as the executable file.
Now that you've created an empty project in CodeBlocks, you won't be able to see any executable file in it. So we better write some code to have it inside our project folder. Create a new empty file and name it Main.cpp ( You may call it anything you want.). Then write a simple Hello World program and run it. After running it successfully you'll notice that a bin folder has been created inside the project directory and inside of which there should be a folder called debug which contains the executable of the code you've written. Now put the dll file inside debug folder.
Remember we created a folder called deps inside our project directory and copied and pasted bunch of folders in it? Right, now we're going to link it with our program so that we may use SDL API(s).

Go to Project > Build options... as shown above.

Go to Search directories > Compiler

deps/include/SDL2 is the relative (to our project) location where the SDL header files are located. Add that directory as sown above.
Now go to the Linker tab...
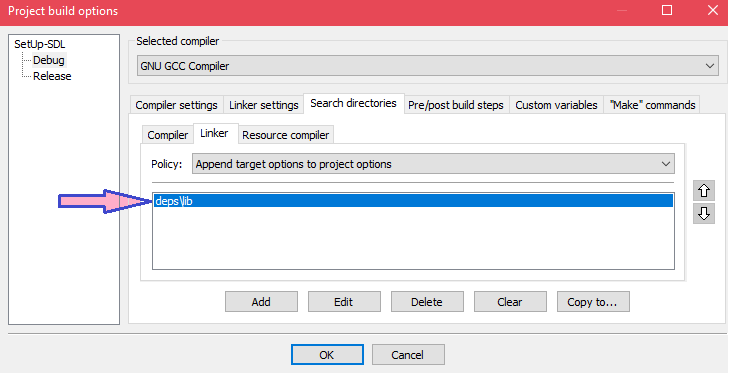
deps/lib is the relative location where the SDL lib files are located. Add this directory as shown above.
One more thing is left...
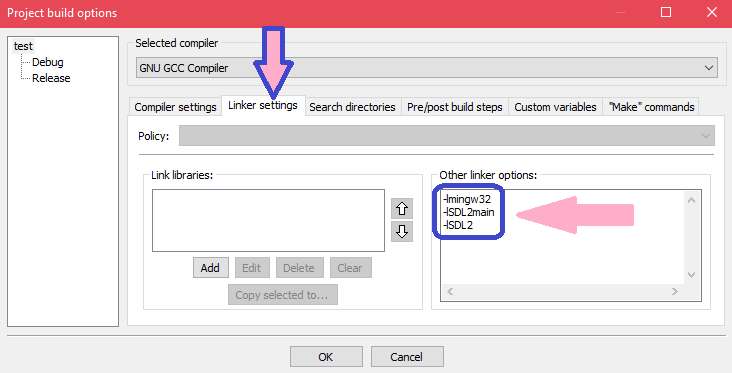
So far, we have added all the header files and lib files. But, in order to compile SDL 2 code, we need to tell the compiler to link against the libraries.
Go to the 'Linker settings' tab and paste -lmingw32 -lSDL2main -lSDL2 into the 'Other linker options:'. Then, click 'OK'.
Now you're all set!
Time to write your first SDL program and run it to see if everything's working as it should be. If it shows error, check carefully whether you've followed each step properly or not.
If you have tried everything and it's still not working, let me know in the comments section below. I'll try to help.
HAPPY CODING!

Comments
Post a Comment